ProcessingからUSB接続ゲームパッドの使用方法です。基本的な情報がなかなか見つかり難くて・・。こういったことをする人は玄人な方が多いのですかね、、。
簡単に使い方と、よく使いそうな内容を備忘録を兼ねて纏めておきたいと思います。
Processingでゲームパッドを使用する際には便利なライブラリ「Game Control Plus」というものがありますので、それを利用します。
準備
ライブラリをインクルードしておきます。Processingで「スケッチ」ー「ライブラリをインポート」ー「ライブラリを追加」として「game」などのキーワードで検索か
けると見つかりますのでインストールします。
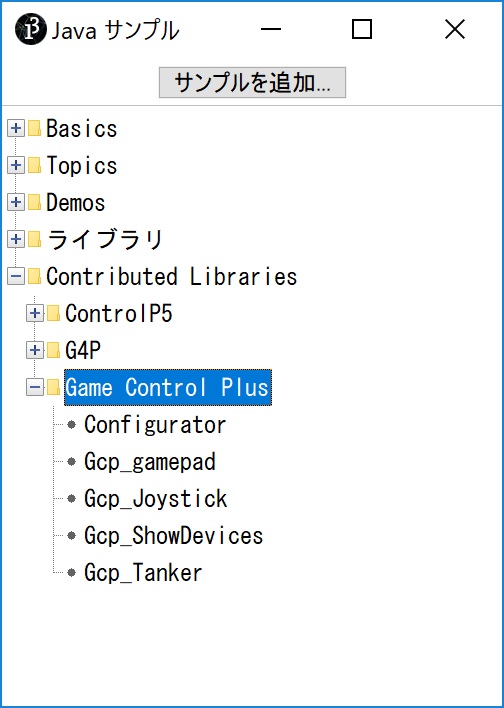
次に接続するデバイス(ゲームパッド)のName(名前)を調べます。ゲームパッドをPCへ接続した状態で、「ファイル」ー「サンプル」を選択。出てきたサンプル画面
で「Contributed Libraries」ー「Game Control Plus」の中の「Configurator」を開いて、プログラムを起動します。

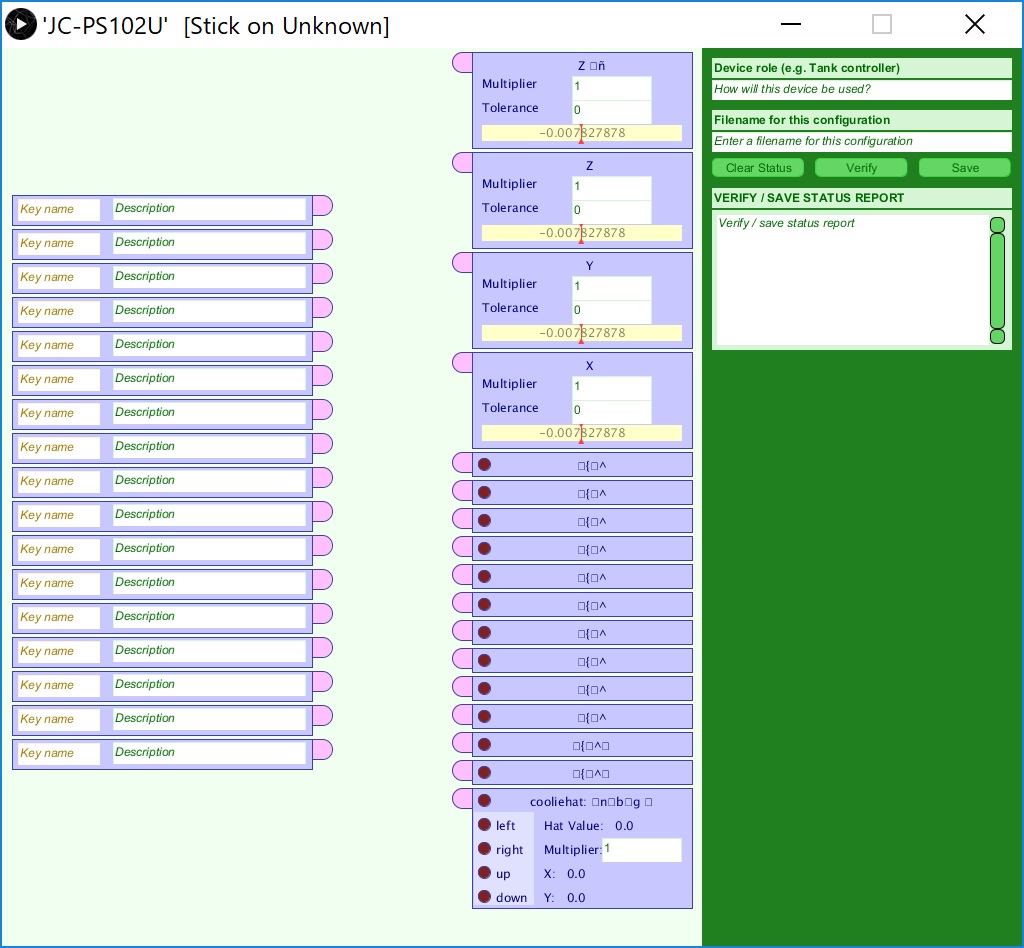
▼こんな感じの画面が起動します▼

ここで使用するゲームパッドのデバイス名が表示されているはずです。認識できるデバイスが全て表示されます。上では順にマウス、スイッチ?、ゲームパッドが認識されてます。
次に目的のデバイス名のとなりにあるボタンみたいな物をクリックすると設定画面のようなものが起動します▼

ゲームパッドを操作すると動きが確認できます。あとこの画面でいろいろ設定、出力ができるようなのですがほとんど使い方が分かりません・・・。
うまくライブラリでゲームパッドの認識(動き)が確認できたらO.Kです。
デバイス名、ボタン名の確認
もう少し、デバイス情報を入手します。
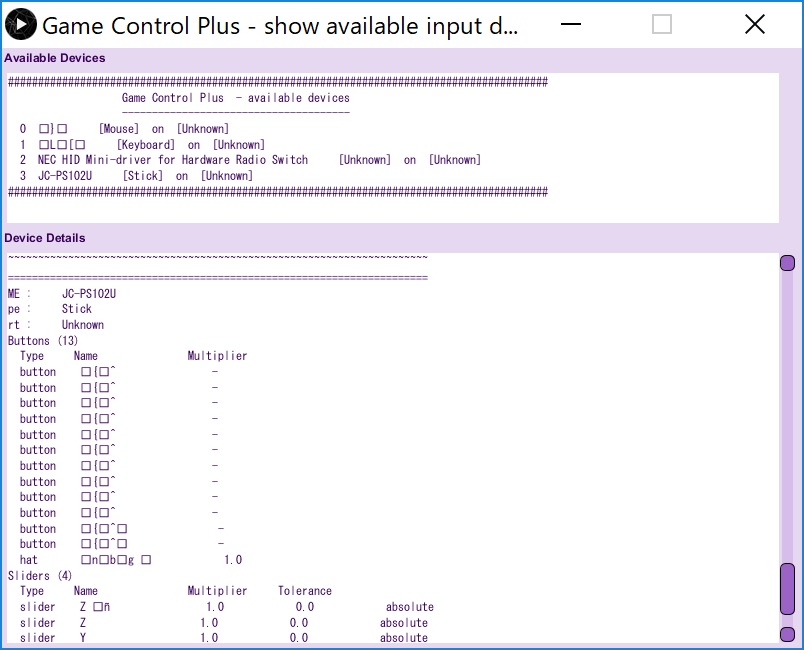
先ほどの「Contributed Libraries」から「Gcp_ShowDevice」を選択します。でProcessingでプログラムを起動▼

上の画面でデバイス一覧が、下の画面でずらっとデバイスの中身の情報が表示されます。
ここでゲームパッドのデバイス名や各ボタンやアナログスティック(Slider)の「Name」名前を控えておきます。
私の環境ではボタンやアナログスティックに割り当てられている「名前」が文字化けしていて不明。ただどうも連番で割り当てられるっぽいので名前不明でもなんとかなりました。
Processingスケッチ(ソース)
デバイスの名前が確認できたら具体的にソースを記述していきます。ソース全体は記事最後に掲載してます。
▼最初にインポートとオブジェクト生成します▼
import net.java.games.input.*;
import org.gamecontrolplus.*;
import org.gamecontrolplus.gui.*;

ControlIO control;
ControlDevice device;
ControlSlider[] slider = new ControlSlider[4];
ControlButton[] button  =new ControlButton[4];
ControlHat hat;
slider、button、hatで生成します。sliderはアナログスティック、buttonはボタン。hatは十字キーでした。今回は配列で定義。アナログスティックがないゲームパッドはどうもsliderに十字キーが割り当てられるようです。(恐らく・・。)
▼次に割り当てていきます▼
  control = ControlIO.getInstance(this);
  device = control.getDevice("JC-PS102U");

  slider[0] = device.getSlider(0);  // RH stick Up-Down
  slider[1] = device.getSlider(1);  // RH stick Left-Right
  slider[2] = device.getSlider(2);  // LH stick Up-Down
  slider[3] = device.getSlider(3);  // LH stick Left-Right

  button[0] = device.getButton(0);   //triangleButton
  button[0].plug(this, "triangleButtonPress", ControlIO.ON_PRESS);
  button[0].plug(this, "triangleButtonRelease", ControlIO.ON_RELEASE);
  button[1] = device.getButton(1);   //circleButton
  button[1].plug(this, "circleButtonPress", ControlIO.ON_PRESS);
  button[1].plug(this, "circleButtonRelease", ControlIO.ON_RELEASE);
  button[2] = device.getButton(2);   //xButton
  button[2].plug(this, "xButtonPress", ControlIO.ON_PRESS);
  button[2].plug(this, "xButtonRelease", ControlIO.ON_RELEASE);
  button[3] = device.getButton(3);   //squareButton
  button[3].plug(this, "squareButtonPress", ControlIO.ON_PRESS);
  button[3].plug(this, "squareButtonRelease", ControlIO.ON_RELEASE);

  hat = device.getHat(12);
  hat.plug(this, "hatPress", ControlIO.ON_PRESS);
  hat.plug(this, "hatRelease", ControlIO.ON_RELEASE);
.getdevice()は先ほど確認したデバイス名を入れます。各キーにも本来であればボタンの名前をいれるのでしょうが文字化けして確認できなかったため数値を入れます。
どうも連番で定義されているようなので適当に入れてどの番号がどのボタンに割り当てられてるかひとつずつ確認しました。ボタン系には押されたとき、離されたときのイベントが使えるようなので合わせて定義しておきます。
◆◆情報の取得◆◆
▼アナログスティック▼
slider[0].getValue();
アナログスティック(slider)にはどうもイベントが準備されていないようなので、.getvaueでそのまま値を拾います。何もしなければ値は-1から1の間で変化するようです。
▼ボタンの処理▼
void triangleButtonPress() {
  ボタンが押されたときの処理
}

void triangleButtonRelease() {
  ボタンが離されたときの処理
}
ボタン類は定義したイベントに合わせて処理します。hat(十字キー)の動きが微妙でした。いまいち使い方不明・・。
簡単な使い方は以上。ほかにもいろいろできそうですが、とりあえずはこれで十分です。
ゲームパッド使っていろいろできそうです。chたくさんありますし・・。
▼ソース全体▼
ゲームパッドからの入力をテキスト表示しているだけのソースです。
import net.java.games.input.*;
import org.gamecontrolplus.*;
import org.gamecontrolplus.gui.*;

ControlIO control;
ControlDevice device;
ControlSlider[] sliders = new ControlSlider[4];
ControlButton[] button  =new ControlButton[4];
ControlHat hat;

int a, b, c, d;
float e, f;

void setup() {
  control = ControlIO.getInstance(this);
  device = control.getDevice("JC-PS102U");//ここは自分のデバイス名に変更

  sliders[0] = device.getSlider(0);  // RH stick Up-Down
  sliders[1] = device.getSlider(1);  // RH stick Left-Right
  sliders[2] = device.getSlider(2);  // LH stick Up-Down
  sliders[3] = device.getSlider(3);  // LH stick Left-Right

  button[0] = device.getButton(0);   //triangleButton
  button[0].plug(this, "triangleButtonPress", ControlIO.ON_PRESS);
  button[0].plug(this, "triangleButtonRelease", ControlIO.ON_RELEASE);
  button[1] = device.getButton(1);   //circleButton
  button[1].plug(this, "circleButtonPress", ControlIO.ON_PRESS);
  button[1].plug(this, "circleButtonRelease", ControlIO.ON_RELEASE);
  button[2] = device.getButton(2);   //xButton
  button[2].plug(this, "xButtonPress", ControlIO.ON_PRESS);
  button[2].plug(this, "xButtonRelease", ControlIO.ON_RELEASE);
  button[3] = device.getButton(3);   //squareButton
  button[3].plug(this, "squareButtonPress", ControlIO.ON_PRESS);
  button[3].plug(this, "squareButtonRelease", ControlIO.ON_RELEASE);

  hat = device.getHat(12);
  hat.plug(this, "hatPress", ControlIO.ON_PRESS);
  hat.plug(this, "hatRelease", ControlIO.ON_RELEASE);

  size(600, 600, P3D);
  smooth();
  frameRate(250);
}

void draw() {
  background(0);


  textUpDate();
}

void textUpDate() {
  textSize(24);
  fill(240);
  textAlign(RIGHT);
  text("LH U-D", 200, 40);
  text(int(sliders[2].getValue()*300), 300, 40);
  text("LH R-L", 200, 80);
  text(int(sliders[3].getValue()*300), 300, 80);
  text("RH U-D", 200, 120);
  text(int(sliders[0].getValue()*300), 300, 120);
  text("RH R-L", 200, 160);
  text(int(sliders[1].getValue()*300), 300, 160);
  text("RH R-L", 200, 160);
  text(int(sliders[1].getValue()*300), 300, 160);

  text("TRIANGLE", 200, 200);
  text(a, 300, 200);
  text("CIRCLE", 200, 240);
  text(b, 300, 240);
  text("x", 200, 280);
  text(c, 300, 280);
  text("square", 200, 320);
  text(d, 300, 320);

  text("HatX", 200, 360);
  text(e, 300, 360);
  text("HatY", 200, 400);
  text(f, 300, 400);
}

void triangleButtonPress() {
  a+=1;
}

void triangleButtonRelease() {
  a-=1;
}

void circleButtonPress() {
  b+=1;
}

void circleButtonRelease() {
  b-=1;
}

void xButtonPress() {
  c+=1;
}

void xButtonRelease() {
  c-=1;
}

void squareButtonPress() {
  d+=1;
}

void squareButtonRelease() {
  d-=1;
}

void hatPress(float x, float y) {
  e=x;
  f=y;

}

void hatRelease(float x, float y) {
  e-=x;
  f-=y;
}

コメント